A House of Cards

Thursday, December 6, 2012

Countdown to Christmas: Quick & Easy Tags

Hey everyone!  I wanted to share a project I created for Countdown to Christmas event on the Pink Paislee blog.

During the month of December, I tend to have lots to do and not a lot of time to do it. So I wanted to share some fun, quick & easy tags with you.


For my tags, I used the Ephemera pack, Parcel Tags, and Snowflake Chipboard. I added them to some mini paper bags and attached them to the bag with mini clothes pins that I got at the craft supply store. There are so many fun cuts in these packs, and they are so cute and festive. You could put together tons of tags in just a short amount of time. They would be perfect for gifts, favors, or just about anything you can add a tag to.


For the first tag, I layered The Santa card with a few die cuts from the Ephemera pack.


For my second tag, I cut out a circle from the stripe patterned paper in the 8 x 8 Patterned Paper Pack. I layered it over a tag and added the reindeer cut from the Ephemera pack and a chipboard snowflake.
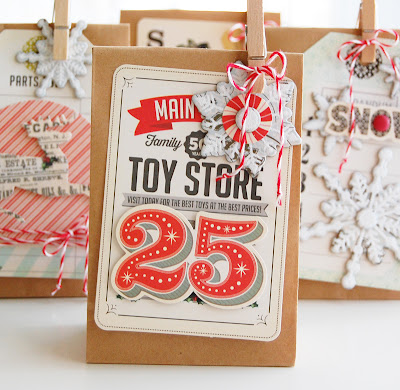


 For the third tag, I layered the '25' cut over the 'Toy Store' cut. I added a candy die cut and chipboard snowflake to the upper right corner of the tag.


For the last tag, I added three chipboard snowflakes and the 'Snow' die cut to one of tags from the Parcel Tag pack.


Visit the Pink Paislee blog HERE for a complete list of supplies used.

Hope you enjoyed today's project. Thanks so much for stopping by!

Monday, December 3, 2012

Pink Paislee's Countdown to Christmas


Make sure to check out the Pink Paislee blog each day until Christmas for gorgeous holiday-inspired projects using the City Sidewalks collection. And I will be back here on December 6th and 12th with my contributions. Have a great evening!


Thursday, November 29, 2012

Wrap it up with Make It Merry


This week on the October Afternoon blog, it's all about fun gift wrap and packaging ideas using the totally cute Make It Merry collection.

I created a few pillow boxes to dress up with some fun bows and embellishments. I cut the pillow boxes out with my Cricut Expression 2 and Close to My Heart Art Philosophy cartridge.


For my first box, I created a classic bow.


I folded 13 strips of patterned paper and layered and adhered them to create the bow. I added some fun die cuts from the Miscellany pack to finish the box.

For the second box, I created a rosette.


I cut the scalloped strip using my Cricut Expression 2 and Ribbons & Rosettes cartridge.  You could easily create your own with a strip of patterned paper and some scallop-edged scissors. I thought is would be a fun change from a traditional bow. I finished the rosette with a Tidbits die cut circle, a coulple of buttons and some ribbon from the Miscellany pack, and a tag that I altered from the Designer Brads pack.

For the third box, I created another paper bow.


This one I cut out with my Cricut Expression 2, Cricut Craft Room design software, and the 3D Bows digital cartridge. This one was quick and easy, only three cuts and a little adhesive to put it together. I wrapped the box with some patterned paper strips and added a few Little Flyers to the bow to finish.

Amy Heller joined me on the OA blog post and you can see her cuter than cute gift wrap ideas HERE.

Thanks so much for stopping by!

Wednesday, November 28, 2012

Studio Calico - Tips & Tricks with 34th Street

Hey everyone! The new December kits (34th Street and Add-ons) are up at Studio Calico, and it is my month to share some Tips and Tricks using them on the Studio Calico Blog. All of the projects I created use the 34th Street Scrapbooking and Card Kits and the Herald Square Add-on.

I thought with Christmas fast approaching it would be fun share some different ways to give gift cards. I tend to give them to a lot of people for all sort of occasions, but sometime they can seem a bit impersonal. Taking the time to jazz them up a bit shows that you put some thought into the gift. 

Here is the gift cards holders I created with a few different themes:


You can download the PDF tutorial HERE on the Studio Calico blog. There are step-by-step instructions along with a few tips throughout. I am sure you will love the kits and add-ons as much as I did, and if you are interested in trying to snag some of your own, you can find them HERE.

I hope you get a chance to check everything out. Thanks so much for stopping by!

Wednesday, November 7, 2012

OA Make It Merry Blog Hop and a Giveaway!

Hi everyone and welcome to the October Afternoon Make It Merry blog hop!


Today, through this blog hop, we will be showcasing the gorgeous and festive new Make It Merry collection from October Afternoon. I know you are going to love it, so let's get started!


created this card using several of my favorite pieces from Make It Merry: patterned paper, chipboard, a postcard, die cuts, and a button. I just love the colors of the collection.


I don't have the Sprinklers for this collection yet, so I used the Witch's Brew Sprinklers from the Witch Hazel collection instead to color the chipboard. I think it works really well with this collection, don't you?


Make It Merry Washi Tape

Today during the hop, I'm giving away a package of Make It Merry Washi Tape. All you have to do is leave a comment here on my blog by Monday, November 12th, at midnight CST,  and let me know how you see yourself using this fun product. I'll draw one lucky winner to receive it. And don't forget to make your way back to the OA blog where the Grand Prize is being given away - a whole Make It Merry Collection Kit! You won't want to miss that!
Now it's on to Jill's blog to see the gorgeous project that she's created with Make It Merry! And if you get lost along the way, here's the list of everyone on the hop.
Roree 
Jill
Winners will be announced later next week!
Good luck, and thanks so much for stopping by!

Tuesday, October 2, 2012

Pink Paislee Artisan collection

I love being able to use punches of color on my projects. And the new Artisan Resistable 8 x 8″ Paper Pack along with the Artisan Resistable Stars from Pink Paislee paired with Heidi Swapp Color Shine mists have allowed me to do just that! I created this card and gift box set full of beautiful eye-popping colors.


I chose a gorgeous yellow, blue, & gray color combo, mixing the Artisan collection and Color Shine mists with the new Portfolio collection.  I am so happy with the result!


 I started off by creating this ‘Celebrate’ card. I misted the chevron patterned Resistable paper with Color Shine in Mustard. I then layered the card with patterned paper, a label sticker, and a heart die-cut from the Portfolio collection, chipboard stars from the Artisan Collection, some glitter letter stickers (an old favorite from the Sweetness collection), and some machine stitching. For the chipboard stars, I added  some Color Shine Tropical Teal mist with a few splatters of Color Shine Tinsel.


I created a fun little gift box to match. This little set could work easily for any type of occasion.


Aren’t the colors beautiful?! I am in love!

Check out my blog post HERE to see a complete list of Pink Paislee products used. 

I hope you all enjoyed today’s project.  Thanks so much for stopping by!

Wednesday, September 19, 2012

OA Midway Miscellany winner

Thanks so much for taking the time to comment, everyone!  The winner of the Midway Miscellany pack from the OA Midway Blog Hop is:

Blogger val said...
I met my scrapbooking online buddy of 4 years in real life for the first time this summer when I headed to LA. We are both scrapbookers so we need to have our pages of this meeting be extra beautiful and this line fits perfect since we went to santa monica pier with the fair on it!!
September 12, 2012 10:21 AM

Congrats, Val!!!  Please shoot me an email with your address so I can pass it along to October Afternoon.  

Have a good evening!

Delete

Wednesday, September 12, 2012

October Afternoon - Midway Blog Hop & a Giveaway!

Hi everyone and welcome to the October Afternoon Midway blog hop!


Several of the design team members have put together some fun projects using the new Midway collection. The colors are so bright and the images are so fun... I know you all are going to love it!  Let's get started!


I created this card using several of my favorite pieces from Midway: patterned paper, chipboard, miscellany, letter stickers, a chapter book page, washi tape, and brads.


Just a fun mix of everything!


 Midway Miscellany

Today, during the hop, I'm giving away a package of Midway Miscellany. All you have to do is leave a comment here on my blog by Sunday, September 16th, at midnight CST, let me know how you see yourself using this gorgeous collection of Miscellany, and I'll draw one lucky winner to receive it. And don't forget to make your way all the way back to the OA blog where the Grand Prize is being given away - a whole Midway Collection Kit! You won't want to miss that!

Now it's on to Mou's blog to see the gorgeous project that she's created with Midway! And if you get lost along the way, here's the list of everyone on the hop.


Winners will be announced later next week!

Good luck, and thanks so much for stopping by!

Tuesday, August 28, 2012

Tips & Tricks - Studio Calico

Hey everyone! Recently, I was asked to contribute on a quarterly basis to the Tips and Tricks column on the Studio Calico Blog. I love Studio Calico kits, so of course I said "YES!!!" Today is my first post, and I am so excited to share it with you all.

As you know, I love to make cards- cards full of layers, texture, and dimension. Sending these types of cards can be difficult, since traditional envelopes are not made to protect them. So for my tip/trick, I am going to show you how to make your own dimensional envelopes perfect for sending thicker, layered cards. 

Here is the card set with envelopes I created:


You can download the PDF tutorial HERE on the Studio Calico blog. There are step-by-step instructions along with a few tips throughout. I used products from September's Central High Card Kit, Central High Main Kit, Style Guide Add-on, and The Register Add-on. The kits are gorgeous, and if you are interested in trying to snag some of your own, you can find them HERE.

I hope you get a chance to check everything out. Thanks so much for stopping by!

Thursday, August 2, 2012

White Room Challenge, Declaration Book, Giddy for Grids, and a Warehouse Sale

Hey everyone! I have really gotten off the blogging kick lately, so I've got a ton of Pink Paislee projects to share with you today.

First off is a layout I created for this week's White Room Challenge on the Pink Paislee blog. The challenge was to start out with a piece of white cardstock and let your imagination run wild. 


I splattered some mist onto the background, because the solid white seemed a bit plain. I used the Indigo Bleu collection along with some of the Wood Shop Alphas to complete the layout.


The colors in this collection are just perfect for feminine or masculine layout, or something a little bit in between (like this one.)


Next up is a project I did for the Declaration Idea Book.


I created a fun little gift bag with a pinwheel flower on the front. It really was a quick and easy project to put together. Aren't these papers so cute?! 


Be sure to check out the other amazing projects by the design team in the idea book HERE.

Lastly, I have a card set I created for the Giddy for Grids post.


I stitched my grids onto patterned paper from the London Market collection.  


I absolutely love the greys, blues, and pinks in this collection.  So soft and pretty, but that hot pink really pops. 


And I think this grey circle paper, Addington, is my new favorite (for the moment, anyway. ;) )

You can see a complete list of the supplies I used by clicking on the links to the original posts on the Pink Paislee blog.

And if you love Pink Paislee products, here is a chance to grab a bunch of it at reduced prices. Pink Paislee is having their 2012 Warehouse Sale.  You can learn more about it here:

http://www.facebook.com/PinkPaislee

and here:

http://www.pinkpaislee.com/warehouse-sale/

But don't wait too long.  It only happens once a year and it will end on August 14th.

Hope you get some good stuff!

Well, that's it for me tonight.  I hope you all have a great weekend!

Friday, July 20, 2012

NEW October Afternoon

Hey everyone!  Long time, no see!  I have been super busy lately, and my blog has paid the price. I wanted to come by and share some projects I made with the new October Afternoon collections, Witch Hazel and Midway. If you are a lover of everything OA, you will not be disappointed. ;) 

First off is a card and layout I created with Witch Hazel:


The images are so fun and retro, and the papers are gorgeous.  Classic Halloween colors of orange and black with fun  pops of green and blue.  


This is their first Halloween collection, and I think they hit it right on the mark!

Next up is a layout and tag using the Midway collection:


The colors in the collection are my faves: a fun mix of green, blue, yellow, orange, and pink. I could create with them all day long and not get tired of them.


The images are so cute, and they have such a fun theme. And I could see this collection being used for more than just the amusement park theme.


They also have two more collections coming out, Make It Merry and Farm Girl, that I didn't get a chance to work with. They are just as wonderful!  Make sure to check out the rest of the design teams blog (in the sidebar or at the OA blog) for more projects.

I will try to be back soon.  Thanks so much for stopping by!